Spreading Insects
by Johan J Ingles-Le Nobel
Last updated August 31, 2017

Entomologists and insect collectors spread insects to preserve them in their natural position, and it's a skill that takes quite some time to do well.
What You Need
- Corkboard pins
- Crossover tweezers or jewelry spatula
- Entomology pins
- Pen
- Plastic cup
- Setting needle
- Spreading board
- Tracing paper
Spreading and carding insects, especially smaller insects, can be very frustrating, so it's better to start by spreading or carding larger specimens first, then as you get some experience with it, move onto doing smaller specimens. Spreading is usually done after cleaning insects and relaxing insects, but before carding insects or pinning insects.
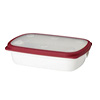
Spreading Board
A spreading board, also known as a setting board, is a board with a groove down the centre, usually made from some softer wood material which allows a pin to be easily inserted and extracted. You can make your own substitutes quite easily using foam board and whilst I still use these having made them myself, I do find that sometimes the foam breaks off and gets onto the specimen which isn't ideal. Spreading boards can be bought online quite easily and the one to get is an adjustable spreading board which caters for insects of different body sizes.
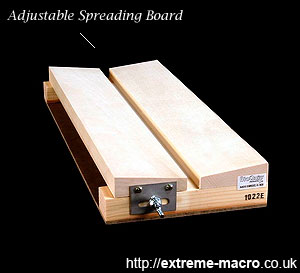
A nice adjustable insect spreading board made by the folks at Bioquip, an entomology supplier in the US. Adjustable spreading boards are a bit more expensive but worth the extra expense if you're planning to spread many different sized insects.
Entomology Pins
Entomology Pins ('Ent Pins') made of spring steel are specially designed not to rust and come in a variety of different thicknesses to accommodate different sized insects. If you are a beginner, sizes 2, 3, or 4 will accommodate the majority of your specimens. Minuten pins also exist, which are pins for very small subjects. Corkboard pins are standard consumer pins that are sturdier but have a bit of plastic over the end. Useful for measuring diffusion as well.
Entomology Forceps
Specimen Preparation Walkthrough
1 ➤ The specimen preparation workflow
2 ➤ How to clean preserved specimens
3 ➤ How to relax specimens for spreading
4 ➤ How to make spread specimens for setting
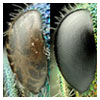
5 ➤ How to cure dehydrated eyes
6 ➤ How to dry a cured specimen fast
7a ➤ How to pin a cured specimen, or...
7b ➤ How to card a cured specimen
Other reading: focus stacking walkthrough
Entomological forceps are the preferred way of handling pins for most experienced people. Good entomology forceps are curved, splayed and have a moulded grip on the closing face. With a small amount of experience, they may be used with confidence to move pins about. They quickly become very good for placing specimens into boxes vertically, even among a densely arranged collection. When starting out a great deal of moving around of specimens will be necessary and so it is useful to become adept with these forceps. On another note, if you are pushing in a lot of pins then a thimble is a good idea.
How To Spread Insects
Spreading insects is definitely an acquired skill that comes easier over time, so don't get too frustrated if you do not manage a perfectly spread specimen every time. Once you get the process down it becomes very easy though, so it's just a matter of experience.
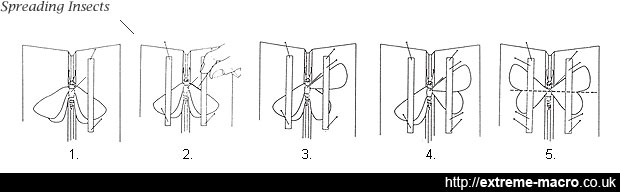
Spreading a butterfly. You can either do just paper strips or use some temporary pins in the wings to move them to a desired position. I prefer to avoid temporary pins because it means less pinholes in the specimen. Don't bother trying to spread unless the specimen is perfectly relaxed. Spreading is an acquired skill that takes some time for it to become second nature.
Steps In Spreading Insects
- Before attempting to spread an insect's wings, make sure the insect is fresh or thoroughly relaxed.
- Use tweezers or a spatula to handle the specimen. Pin the insect through the enter of its thorax, leaving some of the pin above the specimen. Insect pins can be very fiddly to handle and a ridged set of tweezers holding a pin makes the job easier.
- Adjust the spreading board's central groove so it is slightly wider than the body of the insect.
- Push the pin down into the spreading board's central groove until the wings are just even with the top surface.
-
Optional steps
- Prick one of the front wings lightly with an insect pin (just behind the strong vein on the wing's leading edge) and pull the wing forward until its hind margin is perpendicular to the insect's body. Use the pin to hold the wing in place temporarily. You can also use a setting needle to move the wing.
- Using another insect pin, repeat step 1 with the other front wing.
- Using a third insect pin, prick one of the hind wings behind a strong vein. Move the wing forward until it just begins to slide under the hind margin of the front wing. Use the pin to hold the wing in place temporarily.
- Using a fourth pin, repeat step 3 with the other hind wing.
- Once the paper strips are holding the wings in place, remove the four temporary pins from behind the wing veins.
- Cut tracing paper into two narrow strips long enough to extend beyond the front and hind wings. Lay one of these strips over the wings on the left side and another over the wings on the right side. Secure the strips with corkboard pins placed beyond the wing margins and slanted away from the paper so the paper doesn't slip. You can use microscope slides on top to flatten the wings.
- Time, date and ident the specimen on the tracing paper.
- Use additional pins to hold the antennae in a natural position and provide crossed pins support under a droopy abdomen.
- Grab a plastic cup and pin it with a corkboard pin over the specimen creating a hood so that dust doesn't come onto your drying specimen.
- Allowing the insect to dry for a week or so, remove the cup, extra pins and paper strips. Carefully pull the pinned insect out of the spreading board's groove. Handle with care -- your specimen will be very brittle.
Picking Up Specimens
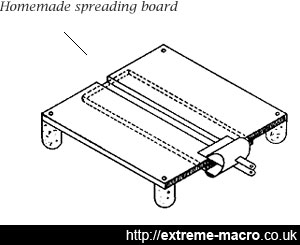
Homemade spreading board using strips of balsa wood, corks and a paper holding clip. These are just fine but if entomology and extreme macro become a long-term activity, you'll probably want to spring for a proper professional setting board.
Cheap eBay cross-over tweezers are good for handling rigid specimens as they are usually made from stainless steel which is easily bent to vary the held size and pressure, and are normally closed and thus hold specimens without needing to squeeze. I have tried various bead holders without much success - the sticky ones don't really stick unless you press down hard whilst the prongy ones will distort a specimen. Generally I use a small spatula and a strip of rubber cut from an erasor to hold down a specimen to put in the first thorax pin.
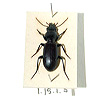
Spreading Beetles
Beetles are a bit harder than butterflies especially if spread with the wings wide open. Start by spreading large easy to find beetles and move onto smaller beetles after some experience with the larger ones.
- Hold your beetle firmly and with your left thumb, gently lift the elytra on one side. The elytra actually lock into each other when the beetle isn't flying, which gives the elytra a waterproof seal when closed.
- You may have to gently lift and pull the elytra several times, before they free up and you can get at the wings underneath. Take care doing this as you don't want to crack the elytra.
- Now that you can see the wings, grab the leading edge and gently pull the wing out from under the elytra. As you pull it out it will automatically unfold. Work the wing back and forth until it is quite free and easy to move. Repeat the process for the other side.
- Place the beetle on your setting board and set the legs into the desired position. This will help to hold the beetle in place while you are manoeuvring the wings.
- Because you are using a setting board, you will require another piece of foam or balsa wood that matches the depth between the board and the base of the wings. This additional board will bring the wings up to level, and your specimen will look much nicer when you have finished.
- Pin this extra piece to the main board with two long pins, this will hold it in place. Move the left wing up into the desired position and hold in place with your finger.
- Cover the wing with some tracing paper and pin around the edge of the wing, This will hold the wing in place while it is drying.
- Repeat the process for the right hand wing, and don't forget to pin the extra mounting board in place to stop it moving. Now finally move the antennae into position and cross pin so that they are held in place. Check that all the legs are in the required position.
- If the wings are slightly in the wrong position, you do not have to remove the paper. Just pull out the two pins that hold the extra block in place and move this block into the required position. Because the wings are held to this, they will move at the same time. Be careful that you only move the block a small distance at a time. Don't forget to replace the two long pins to hold the block in position after you have finished.
Take your time and work in a dust-free place well away from distractions. Spreading your insect is part of the preparation for extreme macro and it's just one of those things that can't really be hurried.
Related Articles