Using A Histogram For Macro
by Johan J Ingles-Le Nobel
Last updated August 31, 2017

Although it's tempting to ignore the histogram on a digital camera, once you make yourself take notice of it your images invariably become better simply because the light is better.
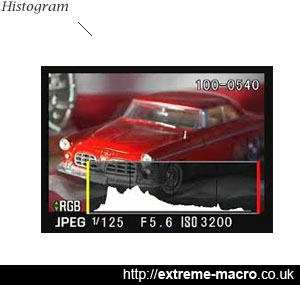
A reasonable histogram.
None of the white area under the curve extends beyond the right or the left, which means there is no information that is lost. This histogram shows more area under the curve towards the left -- in other words a lot of dark tones.
This is a bit darker than I personally like, I try and get more of the information in the right hand side of the histogram as brighter tones tend to have more pop.
Reading a Histogram
A histogram is a really easy to understand bit of information. The more of the area under the curve that is on the right, the more light areas you have in the image. And conversely, the more of the area under the curve that is on the left, the more dark areas you have in the image.
A histogram usually covers about 4 stops of dynamic range from far left to far right, which is about the same as most digital cameras can cover well.
That's probably about all you really need to know although there is a lot more complexity to histograms should you wish.
Preferred Outcome
My preferred outcome when I take a shot is that the descent of the histogram on the right comes down to base just before the end of the histogram.
In other words, I try to make it so that I just avoid clipping any highlights, but with a huge preference for more of the curve towards the right than towards the left. Clipping means you lose the highlights because the information is outside the histogram. If information is recorded on to the sensor outside the histogram then it is either too dark to see detail (if on the left) or too light.
If you think of the total visible area under the curve as the total amount of visual information in the image, then it makes sense that if some of that visible area is outside the histogram, your camera just can't show it.
Summary
- Start using the histogram review feature of your digital camera.
- Set your camera to display a combined thumbnail and histogram for 5-10 seconds after every shot.
- Get in the habit of glancing at it.
- It's the greatest quick aid since the built-in light meter!!!
- Even if the image on the back of the camera looks great, if the histogram doesn't touch towards the right, reshoot. Force yourself!
Typical Process
So for me when I'm outside with my camera, my typical process is one of endless adjustment. I'll start by taking a sample shot, look at the histogram, then adjust the flash intensity or direction based on the histogram, then keep adjusting as I shoot.
Adjustments are necessary more often than you might think, because the colour of the background can change the light values in an image's histogram drastically.
Related Articles