Raynox Adapter Techniques
by Johan J Ingles-Le Nobel
Last updated August 31, 2017

I am an absolutely huge fan of Raynox adapters because they can be used for so many things. They can be used on their own, stacked, with bellows in the studio and even as an infinite tube with microscope objectives.
But above all, they're by far the easiest way to start out with extreme macro as they use the same metering as the regular lens so there are no especially new techniques that you really need to learn beyond learning to be steady.
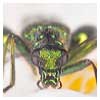
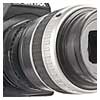
First: One Raynox
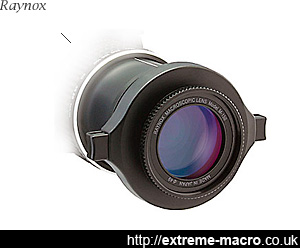
A Raynox mounted on a lens using the included adapter. Using these is by far the easiest way to start out with extreme macro as they're the nearest thing to a regular lens so the learning curve is comfortable. Being achromat closeup lenses, there are absolutely no issues with image quality.
When starting out, it is better to start out with the Raynox 150 first as the depth of field is a bit more forgiving than the higher magnification Raynox 250.
Raynox lenses come sold in a box with an adapter, and the Raynox adapter clips onto the front of your main lens. Just screw the Raynox into the adapter and clip the squeezy bits to the very front of the lens: it grips onto the thread that will usually hold a filter. It all looks a little odd but the adapter is the way it is so it will fit onto many lens diameters.
The most effective use of a Raynox is with a long focal length zoom rather than short (ie on a 50-300 lens rather than 18-50) which gives a working distance (in-focus point) of around 10-20cm. It's easy to miss! With the lens attached to a zoom lens like the 50-300, you change the magnification by altering the amount of zoom. You may find it easier to start with a small magnification, which you will get at 50mm. Although you can use autofocus with a Raynox, when doing macro I find it easier to put the camera into manual focus mode, set the main lens half way and then move back and forward with the camera rather than focusing with the lens itself.
- Avoid sugary snacks, they make you shake.
- Increase your ISO for a fast shutter speed as far as you can go. Noise is better than blur.
- If you run out of ISO, go into manual and set a fast shutter speed and use RAW to bring out more light in postprocessing.
- Anchor yourself, using a monopod or walking stick. Anything you can use to hold yourself or the camera steady, use it.
- Hold the camera close and tuck your elbows in, using them as supports. At arm's length multiplies shaking by the length of your arms.
- Hold the lens in your left hand so that your palm is facing upwards and thumb pointing forward.
- Breathe out slowly while you take the photo, ie don't hold your breath.
- Exhale just before triggering the shutter. Breathe like a sniper.
- Press gently rather than snatch. Less finger movement is less opportunity for additional tremors.
The depth of field will be very narrow. You get the maximum depth of field by using the smallest aperture available to you (the largest f-number, quite possibly f/22). You may find it easier to start out by using a tripod and rail and move onto handheld later. In practise though, adjusting a tripod and rails tends to slow you down outside and only really works for me if the subject doesn't move.
The great advantage for starting out with a Raynox is that you can use all the in-camera aperture controls like you would normally, but most importantly you won't have to fret looking through a very dark viewfinder as you do with reversed manual lenses. Learning how to keep still and stalk is hard enough and the added complication of a dark viewfinder really isn't especially helpful.
The Raynox DCR-250 is a great way to start out in extreme macro because there is no need to change f/stop when mounted, whereas extension tubes result in darkening and light loss. The recommended way to learn to shoot macro with a Raynox is to use a right-angle viewfinder and to focus about 10cm away from your target, then move forwards and backwards until your target comes in focus. The calculator below will give you some idea of the reproduction ratios and the working distances you'll have:
Use of a rear LCD screen is good, provided the blasted thing articulates - from experience with non-articulating Pentax cameras, it is awkward without this. One thing to note is that lenses with a front diamater above 67mm will require a step-down adapter to fit the Raynox. On its own the DCR250 is +8 Diopter, the DCR150 is +4.8 and stacked they are +12.8. Raynox also do a MSN-202, but beware, this is a +25 diopter optic so this is not a recommended Raynox for first time macro shooters as it is 3x more powerful that DCR250. It also has no front thread.
Why Use Flash?
Slight movements of the subject will alter where the focus falls, which can make or break a macro image. Flash is often used because it gives a nice bright burst of light with a very short duration so you can freeze the subject, and use a high f/stop. Another approach to use, especially when the subject is moving, is to take a burst of shots (even a number of bursts) in the hope of getting one where everything is in focus. However, obviously flashes need to recharge so this technique has limitations. My own technique tends to be one in which I take three focused shots, gradually zooming into the subject, although if it's possible to grab the stem that the subject is sitting on with my left hand and use that to brace the camera, this can help as well. Trial and error is your friend.
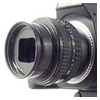
Next: Stack Raynoxes
Once you're ok at using a 150 or 250 on their own you can stack them for even more magnification. Both the Raynox 150 and the Raynox 250 have 43mm and 49mm filter threads that can be used to connect Raynoxes without the snapon adapter, or to stack them using 49mm-43mm adapters. Stacked Raynoxes produce a +12.8 [4.8 (150) + 8.0 (250)] diopter strength; +12.8 is roughly 70mm (1000/12.8) so on 200mm this combo is roughly 3:1 (200/70). Raynox lenses do have plastic threads though, whereas adapters tend to be metal, so do this gently to avoid crossthreading. Obviously stacking Raynoxes like this makes focusing even harder, as the magnification with both of these stacked is now higher than either on their own. The rather nice thing about this combination though is that it also allows me to mount a Pentax ringflash on the end on the 49mm thread and that means I can avoid the dark shadowy areas below an insect which you might normally have with a flash and diffuser combo from the top.

A little weevil shot using stacked Raynoxes on a kit 50-200 and a Pentax ringflash. This is a lovely combination and works very well for extreme macro in the field.
To stack Raynoxes on a kit 50-200, I put on the 250 first then have the 150 beyond that; the working distance is about 10cm at 50mm and magnification is about 3:1 as you zoom to 200mm. A 100-300mm lens might be a better base for stacked Raynoxes giving close to 5:1 but mine broke. Focusing does start to get a little trickier when you use stacked Raynoxes so resting your camera against a walking stick or monopod is a very useful stabilisation technique. Stacked raynoxes also add a bit of weight to the front of the lens so make sure it's reasonably solid. I have never found electronic image stabilisation to be especially helpful at this magnification as it is usually just too slow to keep up but maybe this technology will improve with time. Note you can't stack Raynoxes with MSN-202 because it doesn't have the filter thread you need. But you could always stack 250s if you wanted more magnification. I havent personally tried if it's better to buy a 70-300 and use a stacked 150 and 250, or stack 2 250s on a 50-200 but it might be an investigation worth pursuing.
Beyond stacked Raynoxes, the Raynox MSN-202 has a +25 diopter strength, but this does not have a front filter thread. However, this optic is noted for its high optical quality, and various people also use this to stack with in the studio.
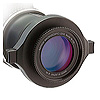
Next: Raynox As Tube Lenses
To show the versatility of these little Raynoxes, if you decide to move beyond a stacked Raynox combo, the same Raynox lenses can even be used with infinite objectives as the tube lens. My Pentax-M bellows have a very convenient rear screw in the frontal mount, and a Raynox will fit into that, both the regular way round and reversed. Using a Raynox as an infinity tube gives a low contrast but chromatically very clean image, and using a Nikon 10x objective with minimal separation between these two lenses makes for high quality output. Others have had good results with a larger separation but for me closer seems to work best. Reverse-mounting the Raynox reduces spherical aberration and increases general contrast, although the Nikon 10x seems to like the Raynox to be non-reversed when positioned close to the objective. The rear element of the DCR 250 needs to be 125mm from sensor plane to be infinity-focused, whilst the rear element of the DCR 150 should be 210mm away from the sensor, the points at which they both find infinite (1000/diopter=mm).
Related Articles