Macro Diffusers
by Johan J Ingles-Le Nobel
Last updated August 31, 2017

A nice diffuser makes all the difference in the world. I use different diffusers for studio and field; for studio macro I tend to mount them straight onto a lens but for field macro I have them sitting on the flash.
Flash Diffuser or Macro Diffuser?
It is worth clarifying at this point that flash diffuser material discussions are prone to a great deal of misunderstanding because there are several different ways the word 'diffuser' is used and understood.
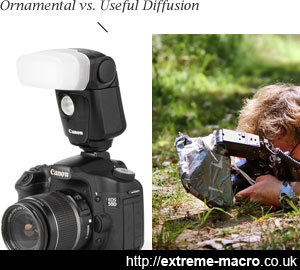
On the left, an ornamental diffuser, not useful for macro. On the right, a proper large DIY diffuser, causing light to come from a large area like good diffusion should. The difference is important.
Opaque plastic sheaths that are nestled over the flash head are sold and described as diffusers, and I suppose technically they are - after all they slightly diffuse the light. However, for the purposes of extreme macro I'd say these completely miss the point and are merely ornamental, as they do not actually increase the visible area that the eventual light comes from, and therefore must still produce specularity and hotspots.
Large diffusers on arms, where the diffuser material is much larger than the flash head, is the sort of diffusion that we like to use in extreme macro. In these, the area of the diffuser (which becomes the light emitting surface when a flash is fired through it) is much larger than the flash and therefore you don't get the specularity that comes from a relatively small light source. All discussions of diffusion below assume this use for diffusion material, not the top one.
Studio Diffusers
In the macro studio I tend to use predefined shapes and wedge them onto lenses and objectives. Initially I used to use clear cylindrical coke bottles (the very large size) with the labels taken off with sticky stuff remover and tissue paper sellotaped round, which works very well but is actually surprisingly difficult to hold up even with a helping hand bought from eBay.
Polystyrene foam cups/chip holder wedged onto the optic used as a diffuser. Polystyrene foam is a gorgeous diffuser because it scatters light so nicely internally and makes the whole surface relatively uniform, rather than letting through a central hotspot.
Nowadays I find it much easier to work with plastic kitchen bowls (which, two of them being spherical together, deliver uniform intensity light to the specimen at the centre) or polystyrene foam cups/chip holders wedged onto the optic. The problem though with wedging a diffuser onto an optic is that this changes light intensity relative to the specimen as you move the optic back and forth on a stack. But that said, this light intensity differential is minimal so it seems to work fine for me, although I'd caution that you should definitely add a small custom hood to prevent light going directly into the objective/lens from the diffuser.
It isn't always necessary to have a perfectly cylindrical diffuser and by shaping one side longer than the other you will get light onto the back of the insect if you want it. I don't tend to have the long shape on the bottom because the bottom is the legs and I don't usually want to highlight those by adding more light.
when you fit a polystyrene foam chip cone over an objective it is very easy to adjust it by pushing the front down a bit or lifting it upOne aspect that's quite nice when you balance polystyrene foam in a lens is that's very easy to adjust them by pushing the front down a bit or lifting it up. That of course changes the strength of the light that falls onto the specimen. Another way to change the amount of light is by using what amounts to flags, which is just a bit of black electrician's tape taped onto the polystyrene. This creates a blockage so it reduces the light. In all it's easier to take light away than to add more light, so I use tape a lot.
There are a lot of different materials that can be used to make diffusers, including all sorts of papers. It is worth trying out alternatives (I have boxes of them) and finding some way to measure their diffusion effect. But measuring diffusion in a sensible manner isn't something I've succeeded with yet, but it's something I'd like to come back to.
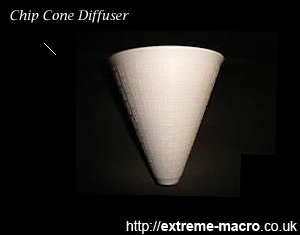
The Chip Cone Diffuser
This is my own favourite material because it scatters so well, but if you want to try using polystyrene foam I would recommend buying some chip cone holders from eBay. What makes these so useful is the fact that the polystyrene foam is relatively thin (so it doesn't eat too much light), the shape is an expanding cone (so it doesn't get in the way of a mounted insect) and it fits many sizes of lens. It is also reasonably close to being equidistant shaped with respect to the specimen, which makes for more even light.
Field Macro Diffuser Materials
The real fun is to be had with field diffusers, and you can find all manner of DIY flash diffusers online. Mine are relatively simple diffusers made to fit both a horizontal and vertical flash unit, and they work a treat for me.
You really don't need much to make a halfway decent outdoor macro diffuser. Black foam board is the main ingredientYou really don't need much to make a halfway decent outdoor macro diffuser. Black foam board is the main ingredient, cut to shape using a sharp hobby knife, taped together using either electrician's black tape or even better and stronger, black duct tape. In terms of the shape you have to think in reverse from the specimen's point of view; a square diffusion shape actually makes an almost triangular shape in the reflection so you may need to overcompensate by making the front end wider than the rear end to achieve a rectangle with regular sides. If you want round then make the diffuser front round. If you want even make it hemispherical and equidistant. It's quite easy.
I like to line the inside of my diffusers with the shiny side of kitchen foil to maximise the amount of flash that actually reaches the diffuser surfaceI like to line the inside of my horizontal flash diffusers with kitchen foil to maximise the amount of flash that actually reaches the diffuser surface, and use various materials as the actual diffuser. Kitchen tissue worked very well indeed but it tends to be a little warm colour temperature wise. Two sheets of vellum tracing paper or a combination of vellum and normal tracing also works well. Heavyweight a4 office paper of the highest quality will also work well but you have to oil it first - oiling bleached 120mg office paper makes it into a tracing paper type transparency. My favourite macro diffusion material though is polystyrene foam, because it scatters light so nicely and is uniform, leaves no central hotspot at all.
White T-shirt cloth is no good as it cuts out too much light, and nylon didn't diffuse the light enough for my liking, creating too much of a hotspot. Laminating paper (the opaque side) can replace tracing paper, the opaque covering from paper binders works too but that lets through a lot of light. Generally the final thing I do is cover the diffusion material (ie tissue paper) with a layer of laminating paper (the completely clear side) on my outside diffusers, and that means there's no risk of damaging the diffusion material.
I do always find it better to set my flash at the widest angle possible when I have a diffuser mounted on top as this seems to make for the most consistent light level across the surface of the diffuser. If the diffuser has too much of a hotspot this helps too, with a next resort of adding a flag (ie a bit of black cardboard) in the centre thus making it into a beauty dish type idea.
Macro Diffuser Material Tests
| Material | Comment | Absorbtion* | Scatter* | Hotspot?* |
Tissue Paper |
Easily sourced and cheap, a two or three ply tissue paper, any old rubbish brand, makes for lovely diffusion material, in studio or on diffuser. Cover with sheet of laminated plastic to protect on outside diffuser. Tends to have quite a warm tone; Kleenex works well (thicker density?) | +++ | ++++ | No |
Polystyrene Foam |
You can't always find it in the right shape or thickness but thin polystyrene is one of the nicer materials because of its beautiful scatter. Unlike paper-based materials it also tends towards a nice truer colder tone. | ++++ | +++++ | No |
Office Paper |
Yes you can use normal high grade paper, but it blocks a lot of light when it is not greased or oiled. Decent uniformity and scatter though. | +++++ | +++++ | No |
Loo Paper |
Not a world different to tissue paper but tends to be thinner so you might need to use a few more layers. Tissue paper is usually larger so easily to make a single diffuser out of - loo paper tends to come apart at the seams which is a tad annoying. Very warm tone. | +++ | +++ | No |
Translucent Milk Bottle Plastic |
Plastic milk cartons are obviously very easy to source and sturdy, but they transmit a lot of light and therefore generally show a hotspot. With these it can help to use black electrician's tape to make flash flags, and you can also sandpaper it to make it have a bit more scatter. | + | + | Yes |
Lee Diffusion Materials |
Available in differing grades but I've always found them still to show a hotspot. Also, expensive alternative to multiple sheets of tracing or vellum paper which more or less do the same thing. | + | ++ | Yes |
Vellum Paper |
Vellum paper is a thicker variety of tracing paper and is easily sourced on eBay. Combine several sheets together with tracing paper and if you balance the flash strength and distance well you can get nice diffusion out of it. On its own one sheet is too thin and transmits too much. | + | +++ | Yes |
Tracing Paper |
Very easy to source but you'll want to stack a few layers with Vellum to avoid hotspots and increase scatter. | + | ++ | Yes |
Unlaminated Laminating Sheet |
Very similar to tracing paper and more durable. But quite expensive. | + | ++ | Yes |
White T shirt |
Very warm tone and blocks a lot of light. Too coarse a material, doesn't really work | +++++ | ++ | Yes |
White Nylon |
Warm tone but shows a hotspot, doesn't really work | ++ | + | Yes |
Oiled Office Paper |
Oiled office paper goes translucent (try it!) and works very well, much like thick tracing paper. But having to re-oil periodically made this a non starter for me because I protect with laminated laminating paper, so had to take it apart each time. | + | + | Yes |
Bubblewrap |
Obviously useless on its, own but can be layered in to add a bit of extra scatter | + | + | Yes |
Styrofoam (thin packing material) |
Similar to polystyrene but thinner and much more translucent; the thin stuff used in packing. Good when added and layered with other materials but on its own shows a hotspot. | + | ++ | Yes |
Shapelock/instamorph |
See section entitled "Shapelock - Make Any Shape Diffusion Surface" below. Properties flexible depending on thickness. | * | * | * |
* - On light absorbtion, more + equals more absorbtion, up to about 2-3 stops on polystyrene (depending on thickness of course). Scatter represents a measure of whether the light comes through as a straight ray or whether it bounces out in many directions after going through the diffuser material. Hotspot is a measure of whether you see a clear centre tapered hotspot on reflective surfaces with intensity rising to the centre or whether the reflection of the diffuser surface is relatively uniform. Obviously this partially depends on your strength of flash lighting and the distance, which with me is less than 10cm from the subject. You will be able to change this yourself so you may not have the hotspots I've had. * means controllable, up to you. Rough guide only.
Why Do Microscope People Use PingPong Balls?
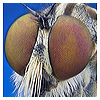
Say you've built yourself a nice diffused flash setup, be it using a flash on a flash arm or a horizontal flash, and you're wondering why your flash reflection on your shiny insect or pin test here isn't as uniform as it could be and still has a horrible hotspot - besides looking at the material, you might look at the diffuser shape. With a diffuser, the diffusion material in effect becomes the light transmission source, not the flash behind it. This is a very important observation to understand dealing with diffusers.
There is a good reason shape matters, and you have to go back to first principles and light falloff. With a completely flat diffuser material, even at right angles to your specimen, the light emitted by that plane has different distances to travel before it gets to your specimen. With the inverse square law of light, falloff will always make one part of the flat diffuser deliver different light intensity to the target than another. A diffuser surface is a wide plane, so at the outer part of the diffusion material, light has farther to travel thus gives different light intensity relative to the centre. This is a flashbook calculator spreadsheet that helps illustrate this idea, albeit obliquely.
However, with a diffuser surface shaped so that it wraps round the subject (ie ideally perfectly spherical round the subject), the diffuser plane's light all travels the same distance, so there is no relative difference of intensity from any angle - this explains the shape I mean better. The most complete form of such a 'spherical delivery of light' that I'm personally aware of is the historical use of pingpong balls to diffuse light used with microscope objectives in the microscopy community, but there is a happy tradition of ingenious photographers creating hemisphere DIY diffuser builds following presumably the same "spherical delivery of light" logic. Piffle ball diffusers in microscopy are the same principle (but larger), as is light bounced off the inside of a reversed umbrella.
Shapelock - Make Any Shape Diffusion
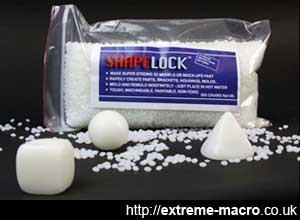
Shapelock polycaprolactone moldable plastic - drop it into hot water and make your shape. Using a pasta sheet roller or something similar, you can make a thin diffusion material in any shape and thickness that you wish and it will be rigid when it has cooled down, so you can drill it, cut it, etc. And if it doesn't work the first time, just reboil the material and try again. Great fun for tinkerers.
Many paperish materials are used as the DIY macro flash diffuser material (ie see above). There is another macro diffuser material that I think is also worth recommending, namely moldable plastic. Moldable plastic is a polymer made out of polycaprolactone (PCL), which is marketed under various names including Shapelock, Thermomorph, Polymorph, InstaMorph, CAPA, Friendly Plastic, the list goes on.
As the name suggests, moldable plastic is user-shapable plastic. It is sold in bead form, usually by weight. You really don't need mountains of the stuff. I have 500g and I should imagine I can make at least 5+ thin a4 diffuser sheets with this if I really really wanted to. All you do is heat up a pan of water and drop it in, the beads then melt, go clear and join together in the pan, you take out the putty-like mass and it can then be shaped and reshaped as you wish whilst warm. When cooled down, the material is completely rigid, white and semi-opaque, very much like a kitchen cutting board. But if thin enough it is much like a diffuser material with the advantage that it is not only rigid and lasts, but more importantly can be made into any curved or rounded diffuser surface shape - ie no more limitation of using just a flat paper plane. You can then make it fit any unique diffuser housing shape you wish - epic example here - and actually come to think of it you could also surely use it to even make the housing itself, ie dye it. Of course you can cut away and use plastic milk containers or other white plastic bottles if you need a round diffuser surface shape like has already been done for years, but it seems to me this material takes things further and allows us tinkerers total flexibility over all aspects of the shape.
Whilst trial and error is your friend, in my limited experience it will not stick to metal or glass after cooling, so it should be perfectly possible to create a very nice round shaped diffuser surface (or any other curved shape) by cooling it over another shape. Melt it, make a nice even thin sheet (using a pasta rolling machine), then drape it over your favourite rounded shape and let it cool. So instead of using flat paper or flat tissue plane, you can make your own curved shape of cooled-down shapelock. If like me you are the type to tinker and make things, this material is a great tool to have in your arsenal and great fun too. Besides its use for making diffusers there are all sorts of other useful objects you can make using it, for example a custom GoPro camera mount or I should imagine a widget for keeping the aperture down on a reversed lens which lacks a manual aperture ring. The possibilities are literally endless.
I personally believe there is a huge potential for DIY flash diffuser making experimentation with this material as long as you can get it thin enough. The non-branded stuff is cheaper - my eBay alternative worked perfectly fine for me and with enough care and shapelock skills I would have thought that you should be able to make any diffuser shape for a fraction of the cost that is charged by equipment manufacturers. I cannot say that I have made this myself but I initially bought this to make parts for this chilling chamber (Arduino IR servo controlled custom arms). But it looks like it should work though I do think it may take a little work to get it thin and even enough.
Heck you can even use this complete material flexibility to your further advantage by redoing iterations with variable thicknesses in an part of the diffuser sheet. You could progressively work towards eliminating any hotspots by tweaking different thicknesses across the diffuser sheet. After all, thicker just blocks more light, so with enough tinkering, in theory you should have control over both shape and intensity, and in a nice gradual manner. Thickening the diffuser gradually would look better than doubling or tripling tissue sheets, which could show and be ugly in a reflection. And if it doesn't work as you'd like, just reboil the material and make a better one. Great fun for tinkerers. If you do decide to tinker with this drop me a note or add a comment, It'd be great to see a result.
Forget UV Diffusers
On the principle that it's worth mentioning failures too so that others don't bother trying it out, I bought a bank note UV detector and made a diffuser that had this mounted in front, hoping that the bugs might stay a little longer because they liked the UV light. The insects were not remotely impressed with my amazing construct and it didn't make any difference whatsoever.
Flash Diffusion Downloads
Related Articles