MPE-64 Techniques
by Johan J Ingles-Le Nobel
Last updated August 31, 2017

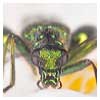
The MP-E 64 is an ongoing project that I started in 2012, being originally named mp-e 64 on Flickr. The goal is to make a Nikon, Pentax, Sony or anybrand compatible mp-e 65 equivalent macro lens for APSC which, being a zoom lens that can go from 1:1 to 5:1, demands some special techniques to master.
Starting Extreme Macro
Anybrand MP-E 65mm extreme macro lens can make for a reasonable 'good enough' extreme macro zoom lens, and can achieve some decent results.
MP-E 64 is challenging to use and I would recommend that you start elsewhere and become comfortable shooting with raynoxes first and reversed lenses second. If you dive straight in with an MP-E 64 having done no extreme macro before you'll find that you don't get the best results out of it and you'll find yourself frustrated. The main challenge is the magnification, which means that objects come in and out of focus very quickly as you use it.
You also have to think on your feet with the lighting with the MP-E 64. Although the use of the empty lens allows you to change aperture in the camera, there maybe times when you'll want to extend the range of light level options that you have available by changing the manual flash settings, altering the aperture, adjusting ISO or even changing the distance-to-subject of diffuser to subject.
Dealing with all these additional variables makes for a multidimensional approach to understanding your camera and its functionality, which, if you have not achieved a certain level of camera and light understanding before, may overflood you with choices if you're also trying to get to grips with the basic focusing and manual techniques needed to get down and dirty with extreme macro.
Magnification
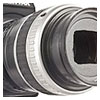
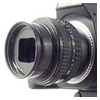
The variable magnification of this unit is achieved by twisting the zoom ring, so choosing a zoom to reverse that has a freely moving zoom that is not tied to focus is essential. Many macro-ish lenses that look useful used in an MP-E 64 configuration ultimately turn out to be difficult to use because the macro zoom is tied into focus and the 50mm+ macro settings can only be physically achieved by having a lens mounted the right way round, which allows for counter pressure to twist the zoom or focus into the correct range. Of the lenses that I have tried, the SMC Pentax FA 35-80 f4-5.6 was by some distance the easiest to use in this regard, which is why I have settled for it myself. There maybe better available but I cannot test every lens that's out there.
Focusing
take a shot first at a relatively comfortable magnification, and use my left hand to adjust zoomI have a straw tool that I attach to the bottom of my DSLR when I have this mounted which gives me a physical distance to go on when attempting to focus on an object. This straw distance is some way away from the view and set at a distance for a comfortable magnification of about 2:1. The straw just gives me a guide so that I know that I can get at least one reasonable shot fast before an insect flies or runs away. you need a diffuser that works well at all magnifications
My technique for focusing this lens is to take a shot first at a relatively comfortable magnification, and use my left hand to adjust zoom (ie magnification) and take several pictures at different magnification levels as I zoom in. I don't need to adjust the flash power or aperture as I'm usually fairly wide open anyway as this lets you zoom in without adding diffraction softening issues. So if I see something I'll usually have a run of 2-3 pictures at different magnifications. The thing to really resist though is getting too close, because this will inevitable scare off your subject.
Making your Diffuser
One thing to watch out for if you do decide to make one of these yourself, your diffuser. It took me several iterations before I was happy with the diffuser to use with this, because you need a diffuser that works well at all magnifications but you don't want it to get in the way of your shooting. So the perfect one extends about 15cm in front, but that's not so perfect for the 3:1 setting because the diffuser will reach behind the subject. My one slopes up a bit and is actually wider at the front than at the back to give me nice light for every mag setting.
Image Periphery
This MPE64 is not the same as Canon MPE65 and costs less than 1/20 of the price. I would not call it better than MPE65 by any stretch of the imagination but I would call it 'good enough'. Because of the very wide zoom range that it has to cover, the outside edges of the frame will show less image quality than the centre and I find it helpful to make sure that the content which really matters is inside the centre 80% of the viewfinder.
Tape the Focus
I do not use the focus ring at all on this contraption so I have mine taped so it doesn't move. Mine is set at infinity which makes for less eventual magnification but I just find it easier to focus set at this. I removed the aperture mounting and added a soft lens cap to give me better flare control and working distance, and like the MPE65 you can add a teleconverter on the front to decrease the magnification and turn it into a relatively normal field of view lens. Setting-wise I typically have it at ISO400, f/11, 1/32 at 1:2 but I will fiddle with ISO and f stop when I use it down at 3:1. RAW is a good format to use with 64 as it gives you more flexibility in post.
Related Articles