Reverse Lens Macro
by Johan J Ingles-Le Nobel
Last updated August 31, 2017

Extreme macro using reversed lenses is not the best technique for a beginner but with perseverance, the results can be outstanding.
not the best technique for a beginnerWith reversed lenses you lose autofocus and auto aperture, it requires additional adapters, it usually requires a flash and if you want any depth of field in your final photo then you'll have to look through a very dark viewfinder. On the upside though, it's fun, it's different, it's challenging and it's cheap.
How to Focus
For reverse lens macro you'll want to get yourself a lens which has manual f stopsWith a reversed lens you won't be using autofocus to focus your shot, because there's no electronic communication between lens and camera. To focus, you move back and forth until your subject is in focus. You can try manually focusing using the focus ring but it's a lot easier and more successful to move forward and backwards. When I use this at night the small torch that is fixed to my camera is itself focused on a particular spot, which gives me a guide to get to the focus spot quickly. During the day I attach a straw or small stick to the bottom of the camera to give me a similar approximate guide to working distance. Beyond that it really is a case of making your best guess where the focus point is and although this comes with time, initially it will make for dizzy focusing, as magnified objects go in and out of focus very quickly.
Lenses for Reverse Macro
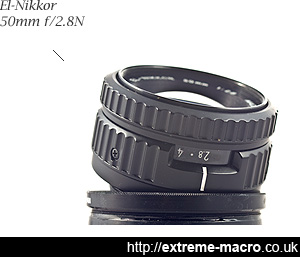
Nikon El-Nikkor 50mm f/2.8N, a good reverse lens choice. This lens is very cheap nowadays because there's no demand for enlarger lenses anymore, expect to pay about £25 for one.
For reverse lens macro you'll want to get yourself a lens which has manual f stops that you can adjust to your preferred f stop setting, and you'll want to add a macro extension tube otherwise you'll have vignetting. As you're not connecting the lens the right way round (ie through the mount of the manufacturer) the brand of your lens doesn't matter as long as it has manual f stops. Old Pentax series-a lenses are usually a good bet for this, they have the manual f stops and there are a lot of them available through eBay.
A 35mm focal length lens is usually a reasonable start and on 10 cm of extension tubes gets you to about 3:1. On the same length of extension tube 28mm gets you more magnification; 50mm gets you less. Decent 6 element enlarger lenses will give better optical quality as they're designed for flat field information transmission; the Nikon El-Nikkor 50mm is an especially smart choice.
For variable magnification there are a couple of techniques with reversed fixed focal length lenses. A focusing helicoid allows you to vary the length of your extension tube so in effect allows you to change magnification on the run. Another option is reversing a zoom. The lens that you reverse doesn't have to be a fixed focal length and you can get reasonably close to the magnification that a Canon MPE65 provides by reversing a zoom lens.
Optimal Quality
Usually we use the reverse lens at its infinity setting for the best optical quality. Small magnification changes are possible using the focus ring but I prefer moving back and forth and taping it fixed. Use of your own custom-made hood will help a lot in getting rid of some of the grey foggyness caused by stray light shining directly into your lens: I tend to use soft plastic endcaps for mine and cut a hole out the middle.
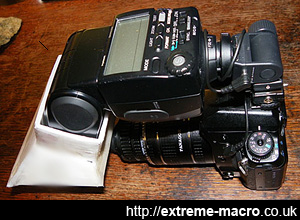
Horizontal flash setup for extreme macro. Rather than having the flash sit on an arm fixed to the camera, I lean the flash right over and close to the subject. This setup uses adjustable shoe mounts and PC-sync with manual flash mode, although nowadays I use a Nissin SC-01 universal off camera shoe cord to allow the use of rear curtain sync. The horizontal setup works well because the flash is very near the subject so you need to use far less battery power, which means longer lasting batteries and much faster flash recharge times.
Light For Reverse Lens Macro
With a reverse lens stopped down to say f/8 for a little depth of field, you'll find that the viewfinder is dark and you'll need to either use a higher ISO or slower shutter speed to get enough light into the picture. You can also use flash - this is my preferred technique - but you'll want to diffuse the flash to make the light soft rather than harsh. TTL isn't very reliable with reverse lens photography and I usually use a manual flash setting with rear curtain sync. If your camera and flash won't behave with an extension tube then confusing your camera into thinking it has a proper lens mounted by using an empty lens is an option. Flashes can be mounted on traditional flash arms although I personally prefer a horizontal rig for compactness.
Have Patience
Reverse lens shooting isn't something that should be done in a hurry. Of the 100 shots you take, maybe a handful will be in the right focus to be worth showing, if at all. This is nothing unusual and shouldn't get you down or frustrate you. I typically go out for 1-2 hr sessions with a support stick to lean the camera on (a shepherd's crook with a V at the top to lean the camera on) or to beat the nettles away and if it's a good day, I have a few worth showing. Be prepared to get down and dirty and try shooting in various directions for more impact. Eyeballs are great so focus on these; don't sacrifice your focus on these for trying to get the whole thing in focus. If you can, shoot against a flower background for some nice vibrant colours. The more you shoot and the longer you let yourself meander about with a camera looking for small stuff, the more you'll get out of it. Take your time, enjoy pootling about, don't stress yourself out, get to know their habits, Rome wasn't built in a day.
Why Are My Photos Grey?
It is not unknown for first photos taken with extension tubes to be very grey and this can happen for a number of reasons, all of which involve light leaks. An overall greyness on all parts of your photo indicates that light is getting to the sensor. To discover the culprit, check that all the seals on your tubes and tubes to lens or camera are light tight and as a test, cover the tubes and connections with some light blocking material - as a quick test a couple of wraps of kitchen foil will work ok. Or black paper with a rubber band. If this solves the problem then either do something to fix the seals and if it's not that, use flocking on the inside of the tube to stop light from bouncing around inside.
Next, try adding a hood onto your reverse mounted lens - those reversed elements gather a surprising amount of light especially if you have a big diffuser on top shining light directly onto what is now the front element. Lastly, other things to check are slightly more mundane - maybe it is condensation, or a very high ISO setting, or even the nature of the scene itself (ie in a scene with low contrast maybe your camera tried to increase tonal range by making white into 18% grey).
Do I Also Need Extension Tubes?
Not neccessarily, but they will help you increase magnification and avoid vignetting if you have it. Extension tubes just make the magnification higher. If it helps, think of the "possible" image as filling an imaginary expanding cone, which comes out from the optical centre of the reverse lens. As you increase the distance between optical centre and the sensor itself, the portion of the cone that actually fills the sensor is a smaller and smaller part of the total "possible" cone. Where extension tubes might help you is if you have vignetting round the edges. By concentrating on a more enlarged image with tubes, you are forcing the vignetting outside what is eventually visible on the final image.
My Reverse Macro is Unsharp
This is common, and usually due to an overly long exposure duration. Reverse lens macro is a lot sharper if you use a flash because even at 1/4 power, the actual duration of the flash is short enough that it freezes the image. If you need to use natural light, then you either need a very still subject or use a high ISO.
Why Is Reverse Macro Tough?
Reverse lens macro is tough for various reasons, but the main one is probably the lighting situation. So when you reverse a lens and use this with say extension tubes, what you're actually doing is taking light and photons that would normally cover the sensor, but instead stretching this out and making the sensor only cover part of the output. This is why it makes for a decent macro lens because by spreading it out, your whole sensor then just sees a smaller area so it is in effect magnified. But this also has implications for light, because you will now have far fewer photons arriving at the sensor. This is erroneously described as light loss - in fact it is probably better described as light division or light spread. Nevertheless, it makes for a dark viewfinder and an effective f/stop that can make things difficult. See this reverse macro calculator here to see this effect for yourself.
The toughest part of reverse lens macro is the fact that you cannot set your f/stop in the camera. This means that if you want some depth of field, then you'll have to look through a lens that is set manually to f/8 using the manual f/stop ring. And, looking through a dark viewfinder for critical focusing is tough. There are no easy ways around this, although the empty lens concept does offer some hope. This problem does not exist with a Raynox macro adapter.
Common Reverse Lens Problems
Most of the problems associated with the reverse lens technique stem from either a light leak or the use of an inappropriate aperture. Be prepared to do some experimentation before the result looks like you'd hope.
Grey
Either the extension tube, or the seal to the lens, or the seal to the body is leaking light, or reflecting it internally, or there is light falling on the front element. Solution: Wrap the lens train with black paper or a thick cloth to prove or disprove, and add a hood.

Vignetting
Vignetting is a problem for some reverse lens options, especially if using a high f/stop Solution: Smaller f/stop (ie lower, wide open) and/or add extension tubes to magnify the good part more. Make sure that your aperture is fully open (see below).

Hot Spot
A hot spot in the centre of your image is a not uncommon problem when using a reverse lens on extension tubes. It is caused by stray light bouncing around inside the tube or between reversed lens and camera, causing overexposure (ie a hot spot) in the centre. Solution: All remedies involve blocking this bouncing light - a simple baffle cut out of non shiny black paper fitted inside the tube, with the centre cut away to let your light through, will work with experimentation for the right size, or alternatively lining that length with an inner tube of flocking from protostar also achieves the same result. Flocking is easier as you're covering the whole length but does run the risk of flocking material dropping onto the sensor.
Dark
When a Nikon lens is removed from the body, the aperture closes all the way. Therefore, your subject appears too dark and you may have vignetting. When a Canon lens is removed from the body, the aperture opens up. Solution: wedge something into the gap that keep the aperture lever pushed to the side, opening it up. If not, the lever will snap close. Wedging a small strip of paper usually does it, or a matchstick, toothpick etc. Even better: buy an old pre-digital 35-50mm lens from eBay which has a manual aperture ring. Pentax-M or Pentax-A 28, 35 or 50mm lenses are a good bet for this and cheap to find. You do need a lot of light for macro - use a flash or Jansjo to light your target.
Camera Complaining
Your camera complains that there is no lens attached Solution: Switch the camera to manual mode. With reverse lenses there is no information transmitted to the camera so it thinks there's no lens attached. Then cameras get cranky.
Can't Focus
Nothing seems to be in focus. Solution: You have to be really REALLY close to something to be able to get focus. You'll need to be only a few cm away from your subject in order to get it into focus.
Unsharp
Images not sharp at all. Solution: If you are not using a flash then maybe you're using a long shutter speed. If the camera and subject are not perfectly still then long exposures give unsharp images. Try using a a flash or a lamp to add more light.
No Depth Of Field
Images have tiny depth of field. Solution: This is normal in extreme macro! Either use a higher f/stop (and risk vignetting) or use focus stacking.