Hoods for Reversed Lens Photography
by Johan J Ingles-Le Nobel
Last updated August 31, 2017

One of the most common issues with reversed lenses is overall greyness of the final image and lack of contrast. Adding a hood is a quick fix, a cheap way to prevent excess light from straying into the image.
Extreme Macro Greyness Problems
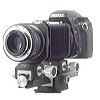
DIY reverse lens macro hood made from a soft plastic endcap with a hole cut out. Easy to make but finding one of these soft encaps, used in the 70s and 80s, can be a bit of a chore.
With diffused flash macro photography, we like to have a nice large flash diffuser that covers a lot of the area from the subject's point of view. The problem is though that if light enter the lens directly from the diffuser into the lens, ie not bouncing off the subject into the lens as such, then this just registers as a uniform grey fog and gives you a low contrast photo with a bit of a washed out look. To some extent this can be corrected using levels in photoshop by adjusting the middle slider, but it can also show up as a much more difficult problem to deal with, a grey or light spot in the centre of your photo. Levels let you adjust the entire photo, but dealing with a circular highlight is a bit trickier, and the better cure is prevention.
Solution for DSLR Lenses
Adding a hood is an easy thing to try, a cheap way to prevent excess light from straying into the imageThe reason that this happens is because light from your flash or diffuser (or the sky if not using flash) is going directly into your reversed lens. This light then gets bounced around inside the lens before reaching the sensor if a very unfocused way. Unfocused light against the black background which macro flash photography usually creates, makes a grey colour when combined.
The solution is really simple, just to make a lens hood for your reversed lens, which blocks the direct light that's entering the (now) front element. To make a lens hood for the Pentax lenses that I use reversed (ie 28mm, 35mm, 50mm) I have found it easiest to re-use the old plastic end caps that you get with the old lenses. Nowadays end caps are made of a tough plastic and these can't be adapted, but the soft ones that they used to come with are really perfect for this as it's very easy to create a sensor-sized hole to let your light through. To be clear, for this you don't want a front cap but an end cap - they're called all sorts of names on ebay but a search for "rear back lens cap" seems to bring out the right objects, but you want a soft, pliable on that you can cut rather than a solid durable one. Seems to me that the ones made of hard plastic look brittle and might crack if you were to try and get a hole in them but this is not from personal experience so if your DIY skills are great and you have the gear it could also be worth trying.
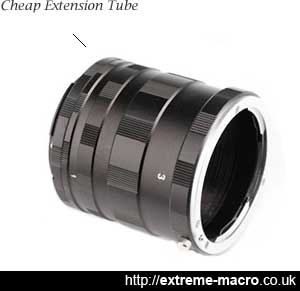
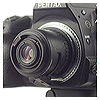
A cheap no-contact extension tube that typically sells for US$5 or so on ebay, an easy to source method for constructing a reverse lens hood for a reversed lens.
You don't have to use one of these soft end caps though if you can't find one, and a perfectly acceptable alternative is one of the dirt cheap three part extension tubes that you can find on ebay for your mount. These screw and unscrew and have two thin end parts and three middle tube parts. Just take the thinnest middle part, put the two end parts round it and use black card to cover the excess hole size, it's pretty easy and not exactly rocket science. It's really up to you to judge how big a hood you need - you'll want it shorter to give you a decent working distance, but long enough to stop any direct light hitting the glass of your lens or hitting surfaces where it can reflect light into your lens.
Macro Lens Hoods?
Obviously a hood could also benefit a macro lens but there isn't much talk of these, why not? Well, it maybe of interest, but the reason there isn't is because most decent macro lenses already have them built in - if you look at a good quality macro lens they usually have a very far recessed front element. This is an inbuilt lens hood - this is how manufacturers build in the hood for you on macro lenses, and for the same reason. Now if they do it to get more out of the lens, then that would suggest that this is probably a sensible thing to add to our DIY extreme macro setups as well =).
Solution for Other Optics
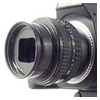
a good cheap alternative that I've been using for a couple of years that works for me - party poppersWe don't just use conventional or 35mm lenses reversed in extreme macro, we also use a bunch of other optics like microfilm lenses, objectives and other lenses, and when reversed they don't give you the standard thread to fit and end cap on so we have to look elsewhere for lens hoods for these. You can buy all sorts of things in strange mount sizes but given that I'm writing this article just before Christmas time, there's a good cheap alternative that I've been using for a couple of years that works for me - party poppers. Party poppers are an English tradition at the Christmas meal and at parties and they're about the right size and shape. Just cut remove the firework element, cut to shape and attach to the optic, it couldn't be easier. I bought a pack of black party poppers for this reason a few years ago and I should think they'll last me a lifetime.
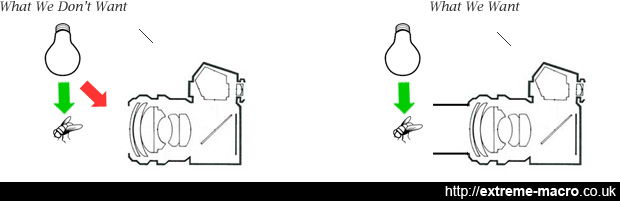
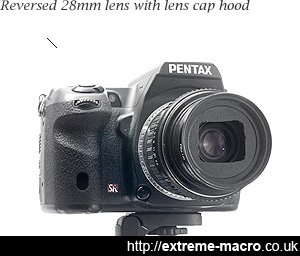
Why you need to use a hood. Direct light hitting your lens, be it either the flashbulb directly or the front most plane of your diffusion material (which in effect becomes the light source), will give you a mundane greyness and lack of contrast. The hooded reversed lens on the right prevents this.
Of course, there are other even simpler solutions for these smaller optics, and there's really nothing wrong with just making a simple conical hood out of stiff black paper and attaching it using something like blutack, heck, maybe it's even better because making one the exact size is very cheap and easy. Do beware though, that dark paper doesn't equate to non-reflecting paper, and if you want to make really sure you might want to add some flocking type material to the inside surface which absorbs light. This is what's used in the astronomy world too, for the same reason.
Another potential solution to the problem of making a sturdy hood for small microscope objectives or other unusual optics that do not accomodate a piece of paper slipped over might be to make and mold your own lens hood using moldable plastic. This is in interesting DIY material that has many applications in the macro DIY tinkering world, for example to make diffusers as well.
Related Articles