Rim Lighting
by Johan J Ingles-Le Nobel
Last updated August 31, 2017

Rim lighting is light that comes from behind the subject accentuating the rim of the subject, and only the rim of the subject.
Rim lighting is underused in extreme macro because of the small scale that we work at and the difficulty of illuminating small specimens from directly behind without part of the illumination mechanism being visible in the image.
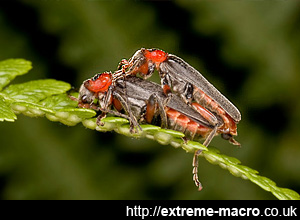
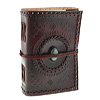
Field macro image enhanced by some subtle additional rim lighting. For a dark subject on a dark background, rim lighting is the way to give the edges a lift - otherwise they'd just merge into the dark background. Difficult to do on stacked studio shots but fibre optic light guides can help give you very directional light.
Terminology
In portrait photography a rim light is closely related to a kicker and a hairlight. A hairlight is, unsurprisingly, aimed at the hair, to make that into a nice highlight so that it stands out from the background and draws the eyes.
A kicker is a light that is still from behind, but not directly behind the specimen, so it is seen as an oblique light, and usually facing the key light. A kicker often adds gradient over a small area of the image in order to accent the area or define shape.
A rim light is behind the specimen and you see the very thinnest of edges. For our extreme macro purposes we shall treat them as one and the same.
Adding Separation
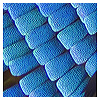
Rim lighting is an underused technique in extreme macro, and it actually offers an answer to the problem of separating a dark specimen from a dark background. Or the avoidance for even separating a light subject from a light background for that matter. Whilst it may seem that the use for rim lighting would be mainly in the studio, it is also very useful in making colours stand out against each other. For example a green subject against a green background - (ie a leaf against leaves), underexpose the background a little but ise rim lighting to accentuate the edge of the foreground leaf.
How to add Rim Lighting
Continuous illumination with a fibre optic head aside, probably the most effective way of adding rim lighting to your extreme macro with flash would be by making a very tight snoot with a grid inside that glances across the back of a specimen from as close to out of the image area as possible.
Fibre Optic Rim Lighting
Another possibility for rim lighting in the studio is this gadget I'm still working on, which uses fibre optics with a flash adapter to carry flash light through fibre optic to an exact spot. I bought fibre optic cable from eBay and cut it with a razorblade to get a nice straight sharp edge. Allegedly burning the end with a flame gives a straight edge but didn't try it and others have reported failure trying this. There is also some special tool that can be used for this but was doing on the cheap so didn't get that - I may do when/if I come back to it. That said it is recommended to polish the end with fibre optic polishing material. The straighter and cleaner an edge you achieve, at a perfect 90 degrees, the more light you transmit. Alternatively, heat a craft knife in a flame until just about glowing and then cut at right angles. Then polish with 1200 grit, wet and dry.
To guide flashlight into fibre optic I used a reversed reject enlarger lens, wide open, in a housing made of foam board that sat over the flashhead, with the fibre optic cable as close to the glass of the lens as possible. This worked ok and gave control over the light output too by altering the f/stop of the enlarger lens. The actual light output is over a very small physical area, and I ended up using 5 strands together in the end, and had to be about 1 cm away from the specimen to be effective. This was thin 3mm fibre optic cable. The housing I made was just a cover that slips over the lit part of the flash with 2 round holes to fit the enlarger lenses into, then with fibre optic touching the glass at the other end leading to the thing to be lit. The fibre optic cable was inside black aquarium airline tubing to keep the light inside rather than have it escape out the fibre optic cable to the outside world. I didn't actually have the enlarger lenses touching the flash but they were offset by 5 cm or so because I got more light with this separation and the flash set at small beam, and I didn't want to restrict the flash heat dissipation ability too much. Gluing the lenses into the housing didn't hold that well and the next version will have some adapter lenses rings to screw them into or even an entire housing made out of polymorph to fit better.
This construct ok as I recall, although the lit areas it produced was a little too small so I need to use bigger diameter fibre optic cables. The setup is rather fiddly because you need something to hold the fibre optic end in place close to and pointing at your specimen. I ended up taping the airline tubing with the fibre optic cables inside along my Jansjo positioning lights and bending those to position them. That's why you don't want fibre optic cable strands that are too thick because they won't bend as easily.
Related Articles