Zerene Stacker Slabbing
by Johan J Ingles-Le Nobel
Last updated October 03, 2018

Substack slabbing is the recognised technique to solve some of the most common challenges that come with focus stacking macro images. Slabbing is a useful tool when used in conjunction with retouching, but by itself it is not a panacea for poor technique or other issues. It is not a technique that is normally neccessary but if the result is poor then it may helf distinctify hairs in front of each other so as to make the final stack more accurate.
Zerene Substack Slabbing Utilities
Manual slabbing is a time consuming and fiddly addition to the standard stack but there are some great utilities to speed up the process for you. These utilities take some time to understand but what they do is write the Zerene Stacker batch job that will create the slabs for you. Use ZereneVS, Slabberjockey, BugSlabber or MakeSubStackingScript ( Windows | Mac ) to generate your substacks. The sheer existence of these utilities alone sets Zerene Stacker above its competitor, Helicon Focus.

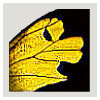
A slabbed focus stack with Zerene Stacker. Slabbing seemed such an obvious benefit that I adopted it very early on in my workflow, and it has helped a lot in gaining encouraging stacking results. The hairs on this bumblebee queen would have been a nightmare without using slabbing to separate them out.
Stacking Challenges
Whilst focus stacking on its own solves the macro depth of field problem, it also brings other challenges in its wake, which are by and large unavoidable because of the nature of stacks themselves.
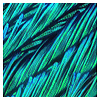
By combining layers, which is what stacking is, one layer maybe semi-transparent and show another layer behind. This is very common in stacking and can lead to a bristly semi transparent mess with, for example, insect hairs.
On top of that, if you have an out of focus background or foreground object, then this can show on the final stack and affect the clarity with which you see the slice that's being shot. This causes an out of focus light level fogginess that detracts from both the accuracy and the aesthetic look of the final stack.
Slabbing Overlap
There is work to be done in this area as there is no generally accepted amount of overlap between adjacent slabs for the cleanest results. Logic might tend to dictate that you'd minimise noise by overlapping less, but at the time of writing 25-50% seems to be the accepted amount. But opinion and experience varies so this should be something that you experiment with.
Slabbing
Most of the solution to focus stacking problems with hairs is slabbing, or substacks: making mini stacks of specific parts of your stack and combining these rather than combining just a single large stack of everything. When processing images in stacking software, the contrast and brightness of the stacked result is based on what went in and the details are merged. And the more images you stack, the more the final stack is influenced by the sum of each separate out of focus area during the stack. So noise accumulates in the darks.
On top of this, whilst the Zerene Stacker PMax mode is an excellent algorithm for outlines, it also accumulates noise, alters colours and contrast, effects which only increase as the stack is deeper. The Zerene Stacker DMap mode is much more about detail and doesn't accumulate as many extras, but it just doesn't always do outlines very well. So to get the best of both, make a main stack using Dmap but touch in partial Pmax substacks for the outlines and where overlapping hairs cause issues. This combination works well for me. That said there's no iron rule about what you should slab, in the sense that for some subjects a pmax stack of dmap segments works best, whereas for others a dmap stack of pmax segments works best.
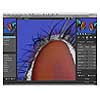
Slabbing certainly makes retouching easier. With overlapping details it helps if the front detail can be fully rendered in one slab just on its own, with back detail in an entirely different slab. Then the slabs can be retouched into the final stack on top of each other rather than merging with fake transparency.
Helicon Focus SubStacking Workaround
Helicon Focus does not have the same substacking utilities that Zerene Stacker does, but with a workaround you can achieve a form of substacks. For a substack in Helicon focus, tick the frames that you want to make a substack of, but you also must add the first frame of your aligned full stack sequence. For example, say you want to make a full Method B stack of 100 frames but think frames 20-30 would benefit from a Method C substack, then for such a substack tick #10-#20 but also tick #1. Then you can make a substack out of these and retouch this output back into your full method B stack using "use different source". If you do not tick #1 and try to just make a substack of #10-#20 the software will not let you use it within "use different source".
This is where Zerene is clearly better for substacking and retouching because it has a function which lets you "stack selected images" and then lets you use the result immediately for any retouching operations into other dmap or pmax stacks of the full run as well. Furthermore, Zerene does not have the align, magnification and perspective issues that Helicon Focus has when using this workaround. I believe this is due to Zerene keeping a full alignment stored in memory and relating each frame to its alignment within the total stack and compensation for scale and position changes, whereas Helicon still does the substack but doesn't compensate in the same manner Zerene automatically does. To elaborate, retouching with a Zerene substack still puts the pixels in the correct place if I have perspective or magnification changes because my lens isn't telecentric, whereas Helicon does not seem to compensate them and puts them in the correct place relative to the substack.
There is also another way to generate substacks in Helicon Focus, using the "split stack" control available in the Pro edition. Split stacks is part of the enqueue menu: main menu > File > Enqueue stacks and use the "by image count" setting to divide your stack into substacks of your chosen number size. Ie to split a 100 frame stack into 10 stacks of 10 you'd set 10 in "by image count". Unfortunately this control doesn't allow any overlap between substacks though, and the same alignment/perspective issues are present as per the workaround method in the above paragraphs.
Related Articles