Pinning Insects
by Johan J Ingles-Le Nobel
Last updated August 31, 2017

Whilst the conventional position used by entomologists to pin insects is of limited use in extreme macro stacking, the techniques are useful as they allow us to pin insects in different positions which lets us take the extreme macro shots we want.
Specimen Preparation Walkthrough
1 ➤ The specimen preparation workflow
2 ➤ How to clean preserved specimens
3 ➤ How to relax specimens for spreading
4 ➤ How to make spread specimens for setting
5 ➤ How to cure dehydrated eyes
6 ➤ How to dry a cured specimen fast
7a ➤ How to pin a cured specimen, or...
7b ➤ How to card a cured specimen
Other reading: focus stacking walkthrough
Entomology Pinning
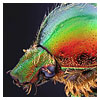
Entomology pinning for insect collectors is usually done straight down, which means that the pin is visible if a headon image is taken.
If a side image of just the head is desired then conventional insect pinning is usually perfectly ok, although pointing may offer more of a visible body if the image is taken from the side.
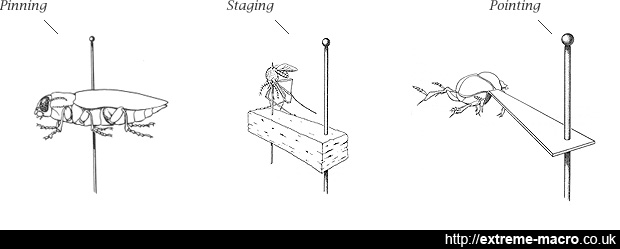
Entomology pinning, pointing and staging of insects. Straightforward pinning isn't that much relevant to extreme macro as we don't want to be able to see the pin, but pointing and angled staging do offer options. Pointing though has limitations because card can be quite wobbly, something we don't want.
Extreme Macro Pinning
Pointing in particular is useful, as it allows a headon view. But in practise, the piece of card that is used for pointing is usually visible on a headon view which why another approach works better, a mixture of pinning and pointing.
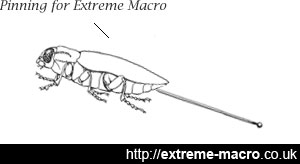
Pinning for extreme macro, with superglue on the tip of the spreading pin to ensure a good solid hold.
Small specimens are tricky and a blackened toothpick underneath the abdomen works well for those.
The use of a spreading pin inserted into the rear of the abdomen instead of card to point an insect gives a solid base, especially if the tip of the needle is dipped in superglue prior to insertion. A stereo microscope and micro manipulator will ensure accuracy and the best angle, and the pin can then be held by a crocodile-clip type device at the correct angle for the shot.
Alternatively, a small .5cm³ piece of cork can be put on the end of an insect examination stage into which a groove is cut, and the spreading pin put in the groove. This also allows the pin to be rotated making finding the perfect angle more manageable.
Specimen Holder
Various devices are available commercially which act as specimen holders, and onto which a piece of cork can be used with a pinned insect.
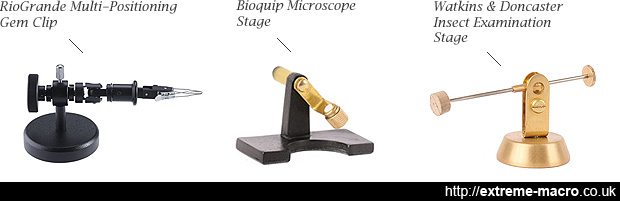
Commercial 3rd hand holder and examination stages made by RioGrande, BioQuip and Watkins & Doncaster. The gem clip is also sold as a microscope specimen holder at a more expensive price. One thing to bear in mind is that you may want to blacken or flock your stage after purchase as bare metal will give reflections and fog that you probably won't want.
Microscopy Holders
Holders for microscopy do seem unnecessarily expensive and there are other products available from the crafting community that perform a similar function, for example 3rd hand tweezers. Many extreme macro photographers including myself end up making their own device, and one of the best value for money ideas is to use a large steel bearing ball on top of a ring bearing and a tower of magnets to hold the needle.
To make your own insect-holding apparatus, google for terms such as "double prong alligator clips" or a number of alligator clip variants (ie long handle, long jaw, thin) - they are used as hair clips and as electrical clips. Using Google images on these will more than likely find you the $1 parts you need, with a bit of DIY, to make something reasonably similar to a $50 manufactured holder. You can also purchase wire gem holders from China, at less than half the price of US units.
Many other tools can be repurposed as a specimen holder with a bit of imagination and creative re-engineering, include a fly tieing vice, a helping hand for soldering and a geared tripod head. Specimen holders can also be used in conjunction with any of the various stages used to move the camera or subject.
Related Articles