Microscope Stage
by Johan J Ingles-Le Nobel
Last updated August 31, 2017
Butchering a microscope stage to give you X, Y and Z plane movement in small controllable repeatable increments is a highly worthwhile exercise and thoroughly recommended.
It's an incredible luxury to have control over both your camera and your specimen in the x, y and z planes, but one that once you've experienced it, you don't want to be without.
Parts for a Microscope Stage
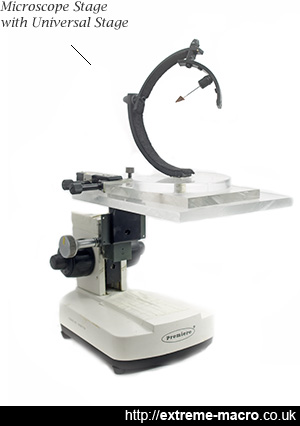
Microscope Stage, with the acrylic sheets I glued on with Araldite onto the actual slide stage showing at the front.
The partner to the microscope stage is the universal stage that is shown on the top.
My microscope stage consists of a broken used child's microscope (but one which has fine focus adjustment), an extra rack and pinion with coarse adjustment that I found on eBay, two 1cm thick pieces of acrylic sheets that I cut to size and a tube of araldite.
In a nutshell, I cut the top off the broken microscope with a hacksaw, took off the existing stage, glued the extra rack and pinion in between, then used an acrylic sheet as a new base (it's clear so I can throw flash light through it).
I then rebuilt the existing stage but instead of the stage being one used to move a microscope slide around, I glued a second acrylic sheet onto its side. This gave me a 1cm thick platform to then put my universal stage on top of.
Between all the various bits, including the universal stage, it gives me x, y and z movement for the specimen, but also the full four degrees of freedom to be able to twist, rotate and point a specimen mounted on a needle in any direction I want. Invaluable, as far as I'm concerned.
Be Careful!
If you're going to butcher a microscope and take it to bits, be careful - I managed to assassinate a perfectly good field microscope by messing with the grease on the rack and pinion. These bits of kits are surprisingly delicate and it helps to have a vague clue what you're doing before you lobotomise one. Using the correct grease is a start.
Buying Microscope Parts

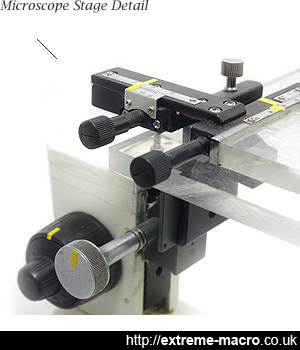
The business end of the microscope stage - the controls on the microscope.
The double rack and pinion gives me a lot of flexibility, as does the re purposed slide stage which has become a perspex sliding table.
The yellow strips give me a reference point where I always start focusing from.
Obviously the largest part of the investment is the microscope itself. Ask for one that has smooth movement and no slippage in the adjustment knobs.
I initially hopes that the light from underneath (the condenser) might be useful for focusing but it was too big and bulky so it was mercilessly removed.
Future Microscope Stage Plans
The microscope base is a bit big and bulky so I suspect that'll be changed in the near future in order to have a sturdy base that lets me also put my flash directly underneath the specimen. At the moment the base gets in the way and I have to slightly angle it which to my overly extreme macro OCD mind is terribly distressing =)
Related Articles


